

[Android/Kotlin] #RecyclerView 사용법 (1)
💡 개요
오늘은 Android에서 RecyclerView를 어떻게 사용할 수 있는지에 대해 예제를 통해 공부해보려 한다.
RecyclerView는 ListView에 비해 가로/세로/그리드 등 다양하게 리스트를 구현할 수 있고,
아이템을 생성할 때 바인딩된 뷰 객체를 재활용하기 때문에 Performance 측면에서 이점이 있다.
그렇기 때문에 다양하게 사용되고 있어 사용법을 익히고 넘어가고자 한다.
💡 STEP 1 : Layout에 <RecyclerView> 추가하기
가장 처음으로 RecyclerView를 사용하고자 하는 Layout에 RecyclerView를 추가해줘야 한다.
나는 activity_main에서 사용하기 위해 다음과 같이 추가했다.
[activity_main.xml]
<?xml version="1.0" encoding="utf-8"?>
<LinearLayout xmlns:android="http://schemas.android.com/apk/res/android"
xmlns:app="http://schemas.android.com/apk/res-auto"
xmlns:tools="http://schemas.android.com/tools"
android:layout_width="match_parent"
android:layout_height="match_parent"
android:orientation="vertical"
tools:context=".MainActivity">
<TextView
android:layout_width="match_parent"
android:layout_height="wrap_content"
android:background="@color/black"
android:gravity="center"
android:text="RecyclerView Example"
android:textColor="@color/white"
android:textSize="30sp" />
<androidx.recyclerview.widget.RecyclerView
android:id="@+id/rcView"
android:layout_width="match_parent"
android:layout_height="match_parent"></androidx.recyclerview.widget.RecyclerView>
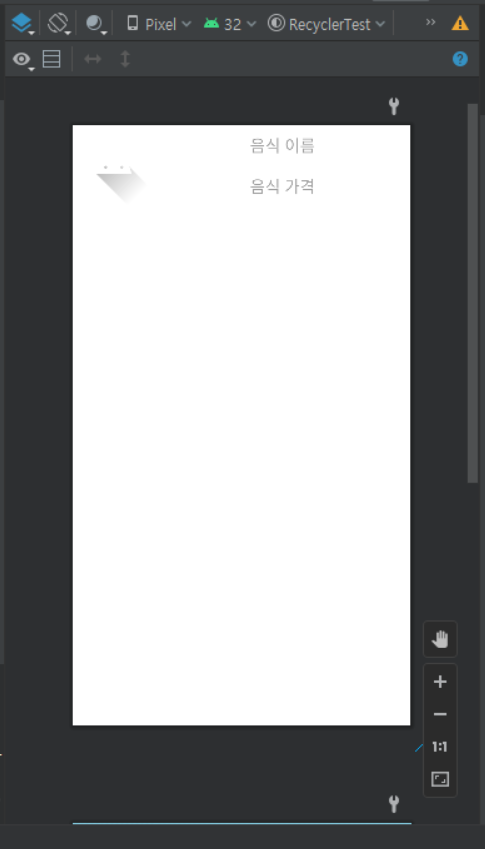
</LinearLayout>💡 STEP 2 : RecyclerView에 들어갈 Item Layout 만들기
RecyclerView를 Layout에 추가했다면 다음으로 RecyclerView에서 사용할 Item을 Layout으로 만들어줘야 한다.
나는 음식 이미지, 음식 이름, 음식 가격을 표현하기 위한 Layout을 만들었다.
[list_item.xml]
<?xml version="1.0" encoding="utf-8"?>
<LinearLayout xmlns:android="http://schemas.android.com/apk/res/android"
    android:layout_width="match_parent"
    android:layout_height="wrap_content"
    android:orientation="horizontal">

    <ImageView
        android:id="@+id/foodImg"
        android:layout_width="100dp"
        android:layout_height="100dp"
        android:src="@drawable/ic_launcher_foreground"></ImageView>

    <LinearLayout
        android:layout_width="match_parent"
        android:layout_height="match_parent"
        android:orientation="vertical">

        <TextView
            android:id="@+id/foodName"
            android:layout_width="match_parent"
            android:layout_height="wrap_content"
            android:layout_weight="1"
            android:gravity="center"
            android:hint="음식 이름"
            android:textColor="@color/black"
            android:textSize="20sp"></TextView>

        <TextView
            android:id="@+id/foodPrice"
            android:layout_width="match_parent"
            android:layout_height="wrap_content"
            android:layout_weight="1"
            android:gravity="center"
            android:hint="음식 가격"
            android:textColor="@color/black"
            android:textSize="20sp"></TextView>
    </LinearLayout>

</LinearLayout>
Layout을 만들었다면 아래와 같은 Item이 RecyclerView에서 연속적으로 나타날 것이다.
💡 STEP 3 : DTO 만들기
나는 Item안에 들어가는 Data를 하나의 List로 관리하기 위해 DTO를 만들었다.
아까 음식 이미지, 음식 이름, 음식 가격이 들어간다고 했으므로 이 3가지의 변수를 가지고 다음과 같이 생성했다.
[Food.kt]
package com.test.recycler

// Food를 나타내는 DTO
data class Food(var img: Int, var name: String, var price: Int) {
}
💡 NEXT STEP
https://coderand.tistory.com/entry/AndroidKotlin-RecyclerView-%EC%82%AC%EC%9A%A9%EB%B2%95-2
[Android/Kotlin] #RecyclerView 사용법 (2)
💡 개요 이전 포스팅에서 RecyclerView를 사용할 Layout에 추가하고, RecyclerView에 들어가는 Item을 만들었다. 또한, Data를 하나로 묶어서 관리하기 위한 DTO를 만들었다. 이어서 Adapter를 만들고 실제 Activ
coderand.tistory.com
'Android > Kotlin' 카테고리의 다른 글
| [Android/Kotlin] #Fragment 사용법 (0) | 2022.06.07 |
|---|---|
| [Android/Kotlin] #TedPermission을 이용한 권한 관리 (1) | 2022.04.20 |
| [Android/Kotlin] #View Binding 사용법 (0) | 2022.04.08 |
| [Android/Kotlin] #RecyclerView 사용법 (2) (0) | 2022.04.07 |
| [Android/Kotlin] #Activity간 데이터 전달 (0) | 2022.04.06 |


